How to Install Circle Patio Slabs in Your Backyard
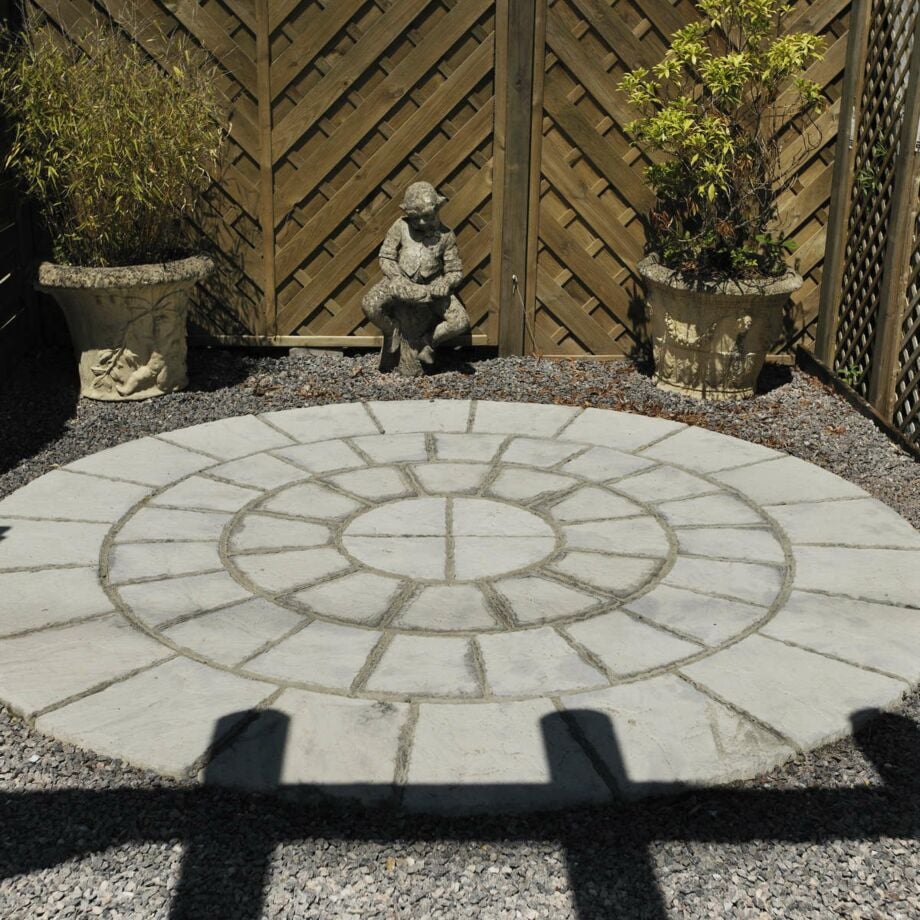
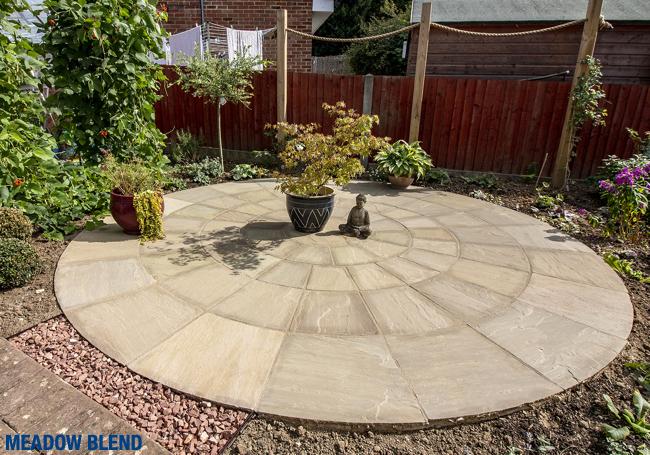
If you are looking for a way to transform your backyard into a more attractive and functional space, circle patio slabs might be the perfect solution for you. Circle patio slabs are pre-cut pieces of stone, concrete, or porcelain that can be arranged in various patterns and designs to create a unique and eye-catching feature in your garden. Circle patio slabs are not only aesthetically pleasing but also durable, versatile, and easy to maintain. They can withstand harsh weather conditions, resist stains and scratches, and suit any style and preference.

In this article, we will show you how to install circle patio slabs in your backyard in four simple steps: choosing the design, preparing the site, laying the slabs, and finishing the project. Whether you want to create a cosy seating area, a focal point, or a pathway, circle patio slabs can help you achieve your desired outcome. You can do it yourself or hire a professional, depending on your skill level and budget. Either way, you will end up with a beautiful and long-lasting circle patio that you can enjoy for years to come.
Choosing the Design
One of the most exciting parts of installing circle patio slabs is choosing the design that best suits your taste and vision. There are many types of circle patio slabs available, each with its own advantages and disadvantages. Here are some of the most common ones:
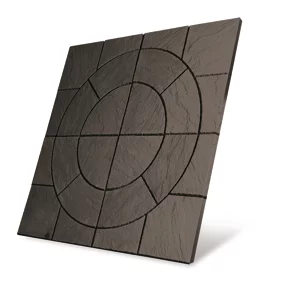
Natural stone: This type of circle patio slab is made from natural materials, such as granite, slate, or sandstone. Natural stone slabs have a unique and rustic look, and they come in various colours, textures, and shapes. Natural stone slabs are also very durable and resistant to weathering and erosion. However, they are also more expensive and heavier than other types, and they may require more maintenance and sealing.

Concrete: This type of circle patio slab is made from concrete, which is a mixture of cement, sand, water, and aggregates. Concrete slabs have a smooth and uniform look, and they can be dyed or stamped to create different patterns and colours. Concrete slabs are also very affordable and easy to install and maintain. However, they are also more prone to cracking and fading than other types, and they may not have the same natural appeal as stone slabs.
Porcelain: This type of circle patio slab is made from porcelain, which is a type of ceramic material. Porcelain slabs have a sleek and modern look, and they can mimic the appearance of natural stone, wood, or metal. Porcelain slabs are also very lightweight and easy to cut and shape. However, they are also more fragile and slippery than other types, and they may not be suitable for areas with high traffic or extreme temperatures.
Factors to consider while choosing the type of circle patio slabs
- The size and shape of your area: You should measure and mark the area where you want to install the circle patio slabs and determine how many and how big the slabs should be. You should also consider the shape of your area and whether you want a full or partial circle or a combination of circles and other shapes.
- The style and theme of your garden: You should choose the type and colour of circle patio slabs that match the style and theme of your garden. For example, if you have a traditional and rustic garden, you may want to choose natural stone slabs in earthy tones. If you have a contemporary and minimalist garden, you may want to choose porcelain slabs in neutral or metallic colours.
- The budget and availability of your project: You should choose the type of circle patio slabs that fits your budget and availability. For example, if you have a low budget and a short time frame, you may want to choose concrete slabs, which are cheaper and easier to find and install. If you have a high budget and a long time frame, you may want to choose natural stone slabs, which are more expensive and harder to find and install.
Preparing the Site
Once you have chosen the design of your circle patio slabs, the next step is to prepare the site where you want to install them. This step is very important, as it will ensure the stability and durability of your circle patio. Here are the main tasks involved in preparing the site:
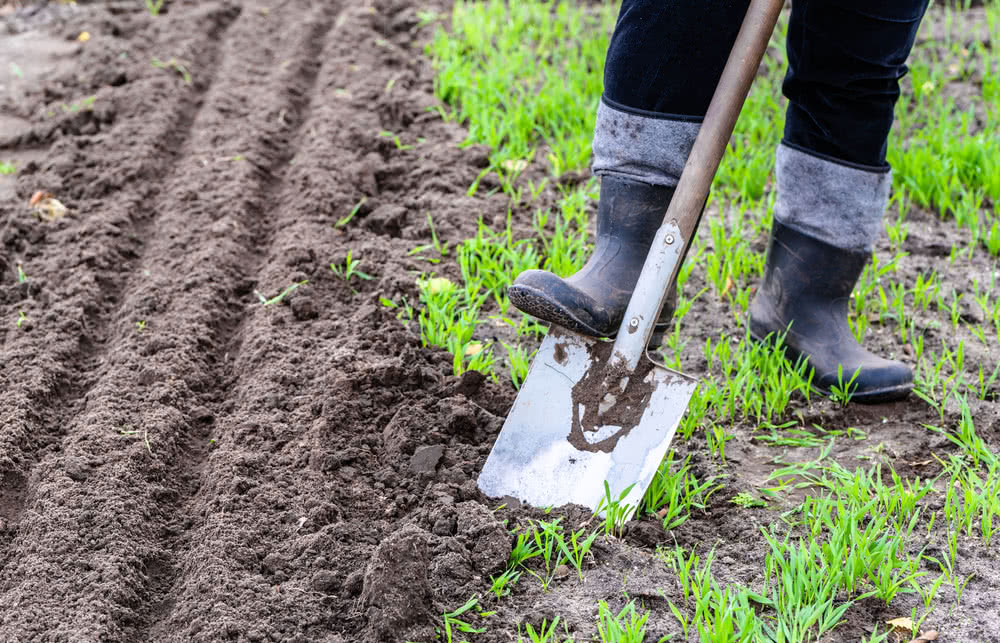
- Digging out the soil: You should dig out the soil to a depth of about 15 cm (6 inches) or more if the ground is uneven or soft. You should also remove any grass, weeds, roots, or rocks from the area. You should use a spade, a shovel, a rake, and a wheelbarrow for this task.
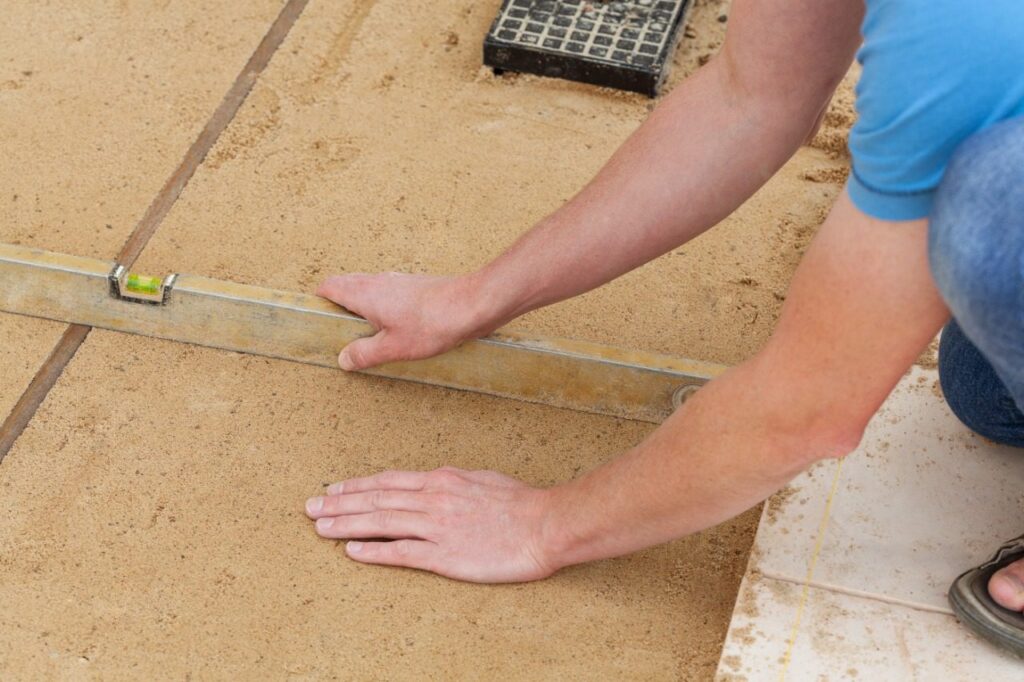
- Levelling the ground: You should level the ground to make sure it is flat and even. You should use a spirit level, a string, and a wooden stake for this task. You should also slope the ground slightly away from the house or any other structures to allow for drainage and prevent waterlogging.
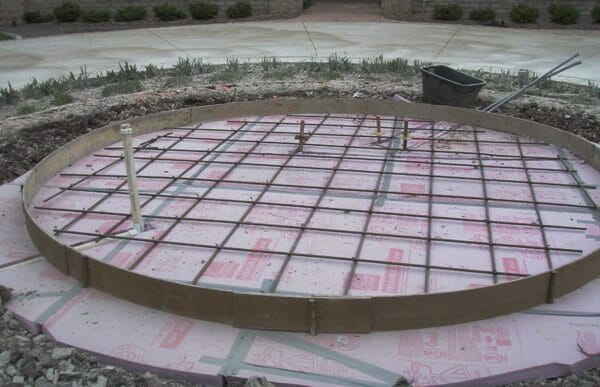
- Creating a base: You should create a solid and stable base for the circle patio slabs using sand, gravel, or concrete. You should spread a layer of sand or gravel, about 10 cm (4 inches) thick, over the levelled ground and compact it using a tamper or a plate compactor. You should also wet the sand or gravel slightly to make it more cohesive. Alternatively, you can use a layer of concrete, about 5 cm (2 inches) thick, over the levelled ground and smooth it using a trowel or a float. You should also create a border or an edge around the base, using bricks, stones, or timber to prevent the slabs from shifting or moving.
Laying the Slabs
The final step is to lay the circle patio slabs on the prepared base and secure them in place. This step is the most fun and rewarding, as you will see your circle patio come to life. Here are the main tasks involved in laying the slabs:
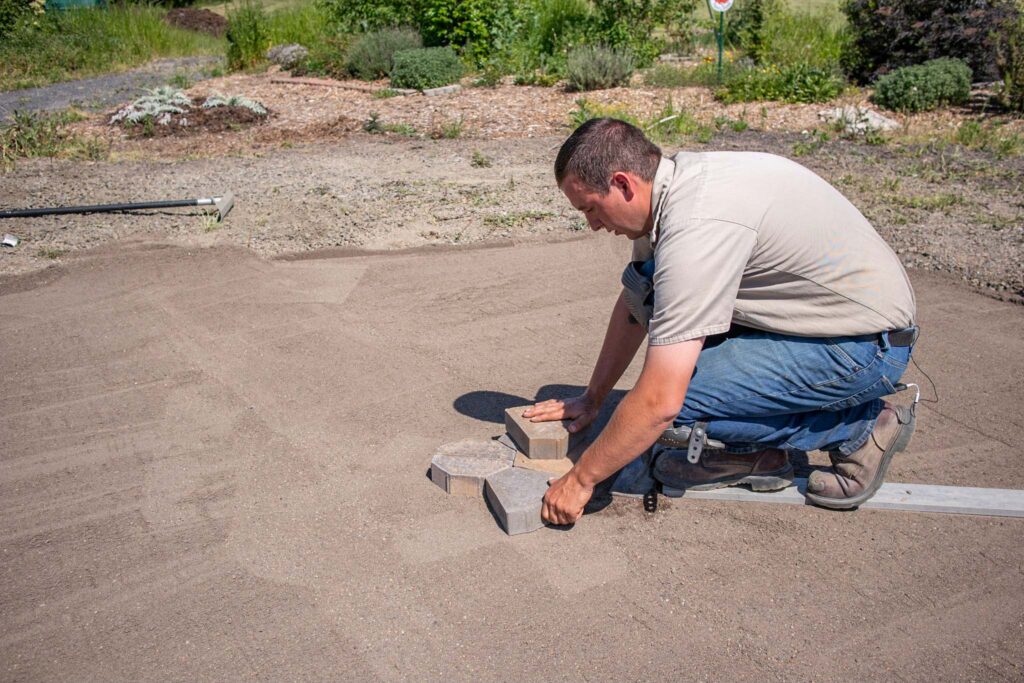
- Laying the slabs: You should lay the circle patio slabs on the base, starting from the centre and working outward. You should align and space the slabs according to the design and pattern you have chosen and use a rubber mallet to tap them gently into position. You should also use a spirit level to check that the slabs are level and even and adjust them if needed.
- Cutting and shaping the slabs: You may need to cut and shape some of the slabs to fit the edges or curves of your circle patio or to create gaps for drainage or planting. You should use a circular saw or a hammer and chisel for this task and wear protective gloves, goggles, and earplugs. You should also handle and dispose of the waste material carefully, as it may be sharp or hazardous.
- Securing the slabs: You should secure the slabs in place using mortar, adhesive, or edging. You can use mortar to fill the gaps between the slabs and create a strong and durable bond. You should mix the mortar according to the instructions and apply it using a trowel or a pointing tool. You should also wipe off any excess mortar from the surface of the slabs using a damp cloth or a sponge. Alternatively, you can use adhesive to glue the slabs to the base and create a flexible and waterproof bond. You should apply the adhesive according to the instructions and press the slabs firmly onto the base. You should also remove any excess adhesive from the surface of the slabs using a scraper or a knife. Another option is to use edging to hold the slabs in place and create a neat and tidy finish. You can use bricks, stones, timber, or metal for the edging and fix them to the base using nails, screws, or clips.
Finishing the Project
The last step is to finish the project and enjoy your circle patio slabs. This step is very important, as it will ensure the beauty and longevity of your circle patio. Here are the main tasks involved in finishing the project:
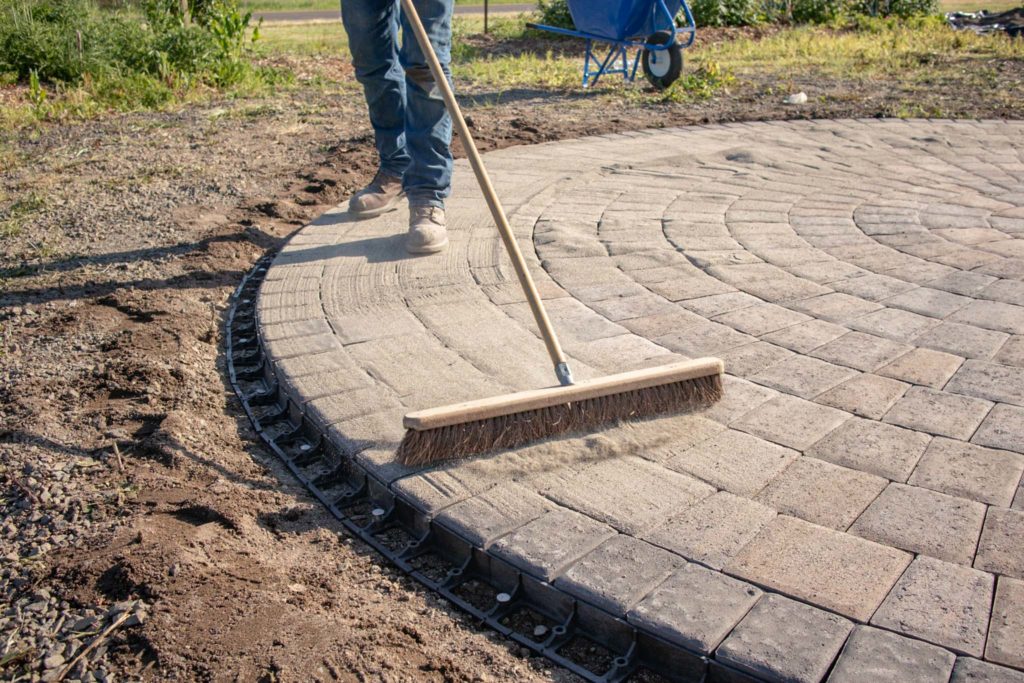
- Cleaning and sealing the slabs: You should clean the slabs to remove any dirt, dust, or stains from the installation process. You should use a broom, a hose, and a mild detergent for this task. You should also seal the slabs to protect them from water, oil, or other substances that may damage them. You should use a sealer that is suitable for the type of slabs you have chosen and apply it according to the instructions. You should also reapply the sealer every few years or as needed to maintain the quality and appearance of the slabs.
- Enhancing the look and functionality of the slabs: You should enhance the look and functionality of the slabs by adding some furniture, plants, lighting, or ornaments to your circle patio. You should choose the items that match the style and theme of your garden and that suit your needs and preferences. For example, you can add some chairs, a table, and an umbrella to create a cosy seating area. You can also add some pots, flowers, or herbs to add some colour and fragrance to your circle patio. You can also add some lanterns, candles, or fairy lights to create some ambience and mood to your circle patio.
Final Analysis
Congratulations, you have successfully installed circle patio slabs in your backyard. You have created a stunning and durable outdoor feature that you can enjoy for years to come. You have also learned how to choose the design, prepare the site, lay the slabs, and finish the project.
You have also learned some tips and tricks to make the process easier and more fun. We hope you have found this guide helpful and informative. If you have any questions or comments, please feel free to contact us or leave a comment below.
We would love to hear from you and see your circle patio slabs. If you are not confident or comfortable with installing circle patio slabs yourself, you can always hire a professional to do it for you. A professional can save you time, money, and hassle and ensure a high-quality and safe installation. You can find a reputable and reliable professional in your area by searching online or asking for recommendations from friends or family.
Disclosure: Our blog contains affiliate links to products. We may receive a commission for purchases made through these links. However, this does not impact our reviews and comparisons. We try our best to keep things fair and balanced, in order to help you make the best choice for you.